| Templot Companion | search | remove search highlighting | if the A-Z Index tab is missing click here |
a page about creating 3-way tandem turnouts in Templot

Any turnout having 3 exits is called a 3-way turnout. They are created by combining 2 ordinary turnouts. They are divided into two basic types:
1. 3-throw turnouts
In these both switches are coincident, with the switch blades overlapping. They are difficult to build and prototypically rare -- used only in sidings and yards, not in running lines, and not at all for many years on UK standard-gauge railways.
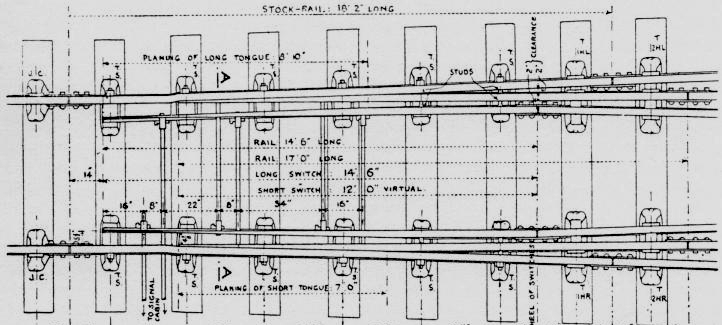
A 3-throw switch (Great Eastern Railway)
Creating 3-throw turnouts is a separate subject in Templot, the rest of this page is about creating tandem turnouts.
Also called double turnouts or lap turnouts.
In a tandem turnout the switches are staggered so that the second switch is placed beyond the heel of the first one. They are quite common on the prototype. Like all 3-way turnouts they require one additional V-crossing, but the expense of this is justified by the great saving in space which they permit.
A tandem turnout can be straight or curved through the main road. The main road is the running line which sees no switch divergence, and can therefore have a higher speed limit.
In a type 1 tandem turnout both switches are in the main road, and such tandems can be double-sided or single-sided.
In a double-sided tandem one turnout is left-hand and the other is right-hand from the main road.
In a single-sided tandem both turnouts are of the same hand from the main road.
In a single-sided type 2 tandem (much less common) the second switch is in the turnout road of the first turnout instead of being in the main road.
A tandem turnout at Beverley (thanks to Mick Nicholson for the photo)
Tandem turnouts are not simple. The two turnouts can be dozens of different sizes and crossing angles. The V-crossings can each be regular, generic, or curviform type. If regular type, the turnout lead lengths can be adjusted by changing the crossing entry straight.
But you can't just combine any two turnouts at random. The turnout sizes must be selected so that there are no rail conflicts. There must be room for the second switch blade to open behind the first one. All the V-crossings must be able to have their check rails correctly positioned. The ends of check rails and wing rails must not obstruct the clearance for wheel flanges on nearby running rails. And the timbering layout must allow the special switch and crossing chairs to be fitted in the proper places on the rails. So that is quite a lot to think about in designing a tandem turnout, and makes them trickier than other formations to get right.
In Templot a tandem turnout is created as a collection of partial templates. You can create a tandem turnout entirely yourself, or you can use the built-in functions to do most of the work. Only most of it, because for the final adjustments it needs a human eye to view the screen and see where adjustments are needed. Generally if you are still track planning you can leave these final adjustments until you are ready to print the templates for construction.
The next part of this page is about using the built-in tandem functions in Templot to create a type 1 tandem turnout.
For details about creating a tandem turnout manually from scratch, including type 2 tandems, click creating custom tandem manually.
about the built-in tandem functions
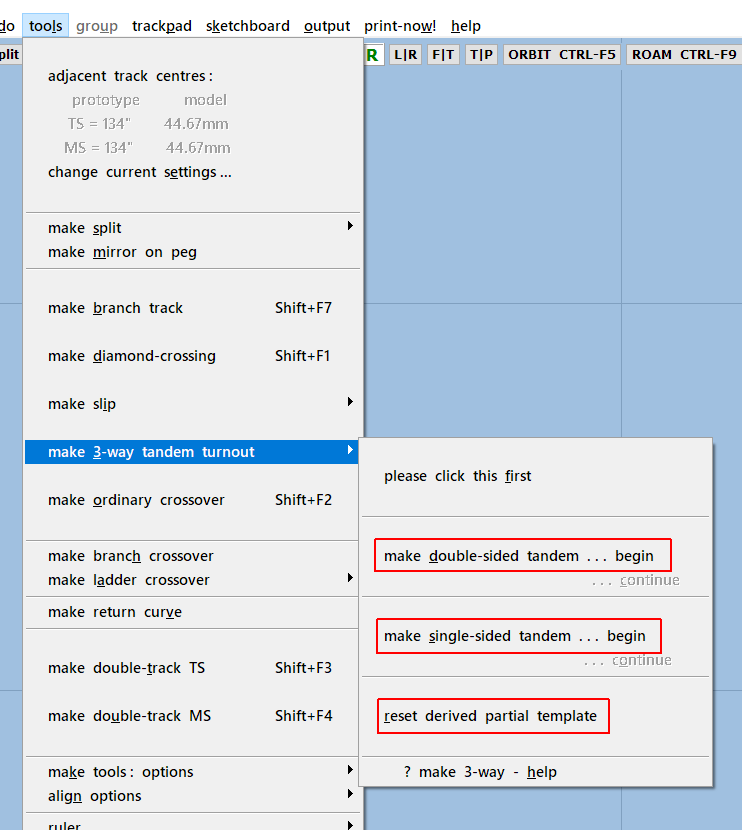
The tools > make 3-way tandem turnout > functions work a little differently from the other make tools:
•You can interrupt the process half-way to continue track planning and confirm that the tandem will fit your track plan, or adjust it to do so if necessary. You can then return later to complete the process of creating the tandem turnout. But you must do that before ending the current working session, or creating another tandem turnout.
•The result is likely to need some further final adjustments by you. This is because it needs a human eye to look at the screen and see what is needed. These final adjustments do not affect the geometry and can be left until track planning is complete and you are ready to print the templates for construction. It is not necessary to make these adjustments in the current working session. If you are lucky no adjustments may be needed.
•The created tandem will be comprised of partial templates. When you work from them in further track planning, for example to create a crossover, the partial-template settings will propagate into your new template. It will be necessary to click the reset derived partial template menu item to return the new template to the normal settings.
using the built-in tandem functions - 1. double-sided
For a double-sided tandem the original starting turnout becomes the 1st turnout in the tandem, and a new 2nd turnout of opposite hand is created beyond it.
1. Start with the required original turnout in the control template. This can be an existing turnout within your track plan. It should be a longish turnout because the new 2nd turnout will be shorter, and its radius may otherwise be too sharp. A starting size of B-7.5 or B-8 is good, or longer if you have space.
The starting turnout can be straight or curved, but not on a transition curve. If the starting turnout has a regular-type V-crossing, the crossing entry straight should not extend beyond the default auto-fit length.
If these starting conditions cannot be met, it will be necessary to create the tandem turnout manually.
The geometry of the starting turnout will not be modified. If it is part of your track plan it will remain in alignment.
2. Then click the make double-sided tandem ... begin menu item.
3. This dialog will appear. Select your required option for the V-crossing on the new turnout:
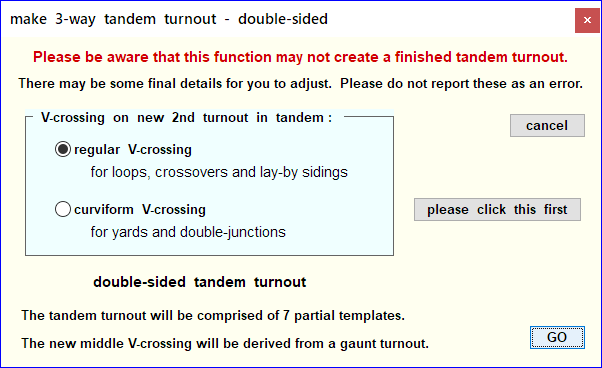
If the connected track will be a loop, crossover, lay-by siding, or other track running generally alongside or close to the first track, select the regular V-crossing option.
If the connected track must curve away from the first track, for example within yards, or in a curved double-junction, select the curviform V-crossing option.
more information about types of V-crossings
If necessary this setting can be changed later when you see the new turnout. But you may then need to adjust the crossing angle to re-align the timbering.
4. Then click the GO button and follow the dialogs which appear.
5.
(page under construction)
Here is a temporary scruff video showing the built-in function for double-sided tandem:

video opens in a new browser tab
if Templot is installed on this computer
you can use the download link on the
video page (if present) to watch in better
image quality on the Templot video player
This page will be updated with more information and videos soon.
using the built-in tandem functions - 2. single-sided
For a single-sided tandem the original starting turnout becomes the 2nd turnout in the tandem, and a new 1st turnout of the same hand is created in front of it.
1. Start with the required original turnout in the control template. This can be an existing turnout within your track plan. If so make sure there is some space (or approach track) in front of it to allow for the creation of the new 1st turnout in the tandem turnout.
The starting turnout can be any reasonable size, straight or curved, but not on a transition curve. The new 1st turnout when created will often be similar in size and radius.
If the starting turnout has a regular-type V-crossing, the crossing entry straight should not extend beyond the default auto-fit length.
If these starting conditions cannot be met, it will be necessary to create the tandem turnout manually.
The geometry of the starting turnout will not be modified. If it is part of your track plan it will remain in alignment.
2. Then click the make single-sided tandem ... begin menu item.
3. This dialog will appear:
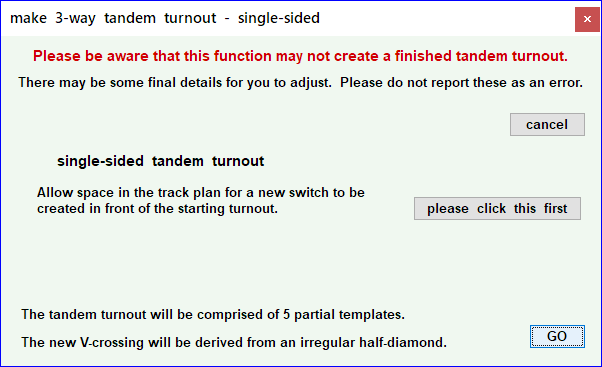
For a single-sided tandem there are no options to select. The new 1st turnout and the additional V-crossing will both be curviform.
4. Click the GO button and follow the dialogs which appear.
5.
(page under construction)
This page will be updated with more information and videos soon.
creating a custom tandem turnout manually
A temporary video showing the basic manual process:

video opens in a new browser tab
if Templot is installed on this computer
you can use the download link on the
video page (if present) to watch in better
image quality on the Templot video player
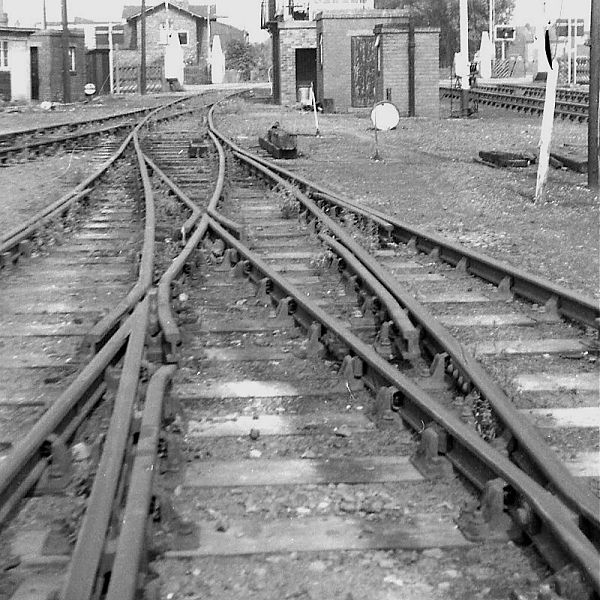
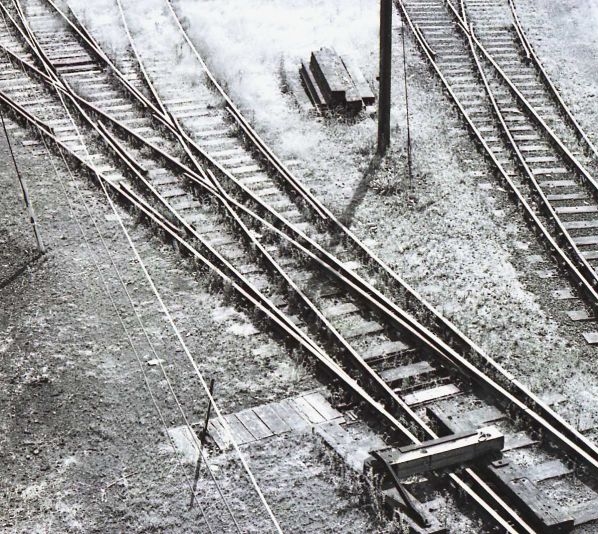
A type 2 tandem turnout (thanks to Mick Nicholson for the photo)
The above photo shows a tandem turnout which would need to be created manually as a custom tandem. This is a type 2 tandem in which the second switch is inserted in the turnout road of the first switch. Despite appearances this is a single-sided left-hand tandem. The main road exits on the left of the picture. The middle road diverges from it with a left-hand switch. The road exiting on the right of the picture diverges from the middle road with another left-hand switch.
This page will be updated with more information and videos soon.
link to this page: https://85a.uk/templot/companion/3_way_tandem_turnouts.php