| Templot Companion | search | remove search highlighting | if the A-Z Index tab is missing click here |
basic working methods
Here is a brief guide to a suggested way of working with Templot.
I'm assuming that you have already learned the basics of Templot and started using it. If not, please see the Templot Explained beginners guide. You may also find origins and intent a useful read in understanding the working of Templot.
Let's start with the first template in my intended track plan. I have adjusted it to the size and position I require, and made other changes such as setting the curving radius and the required style of timbering:
(If you don't know how to get this far, stop reading here, and please see the Templot Explained beginners guide.)
What I'm looking at is the control template, in other words the current output from the template generator. If I change any of the input settings to the generator it will change instantly. So I need to make a "snapshot" copy of its present state for use in my track plan.
There are 2 ways I can do that.
1. The first way would be to click the  button (or press the INSERT key). This function is called store & background. It will cause a copy of this template to be added to the storage box, and also mark it as a background template so that it gets drawn on the background layer of the trackpad. But I won't be able to see it, because the control template will still be on the foreground layer in front of it. To see it, I would need to temporarily hide the control template by pressing the HOME key. My next task would be to move the control template away, and make whatever changes to it are necessary to create my next background template in the track plan.
2. But mostly I will be using the second way. Which is to use the make functions on the tools menu.
 Make is an important word in Templot.
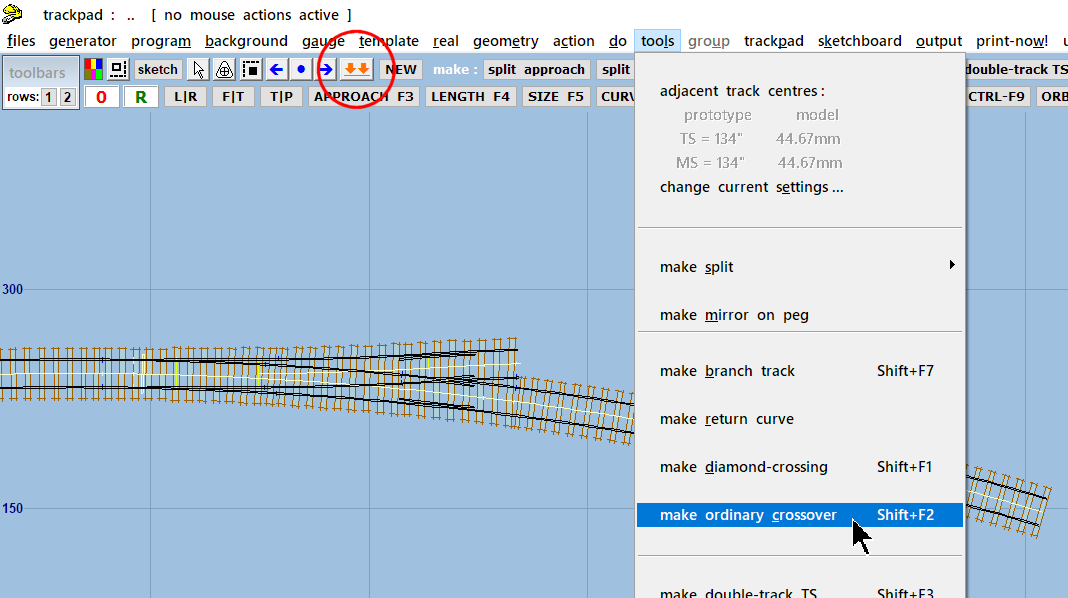
Make means that Templot will do the store & background process for me, and then modify the control template settings to create the next template in the track plan. In this case I want to create an ordinary double-track crossover from this turnout, so I click the tools > make ordinary crossover menu item.
Note carefully that I use the first method, or the second method. But not both, otherwise I would end up with 2 identical templates in the storage box and on the trackpad background.
The result of clicking tools > make ordinary crossover is this:
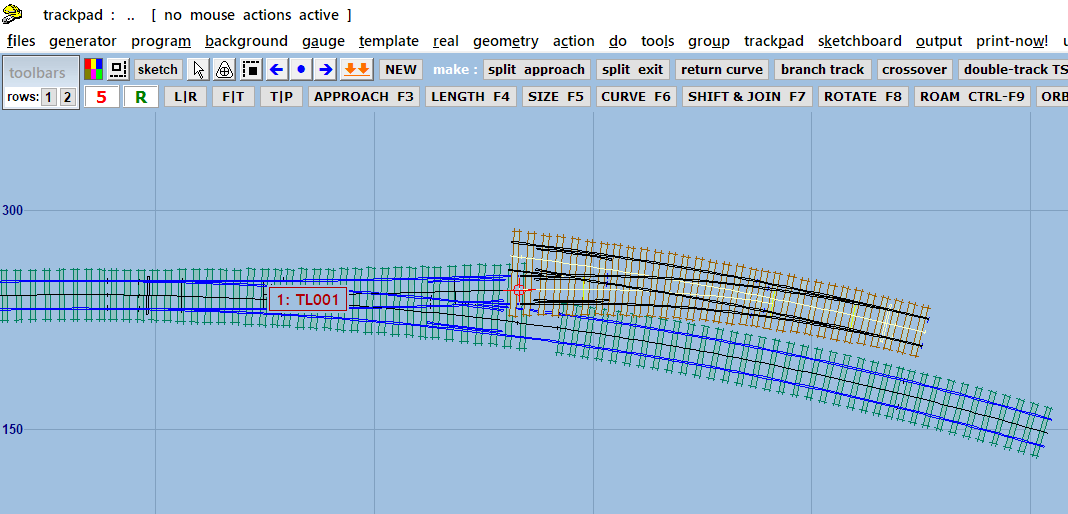
My first template is now a background template, and the output from the template generator in the control template is now the matching turnout needed to make a crossover.
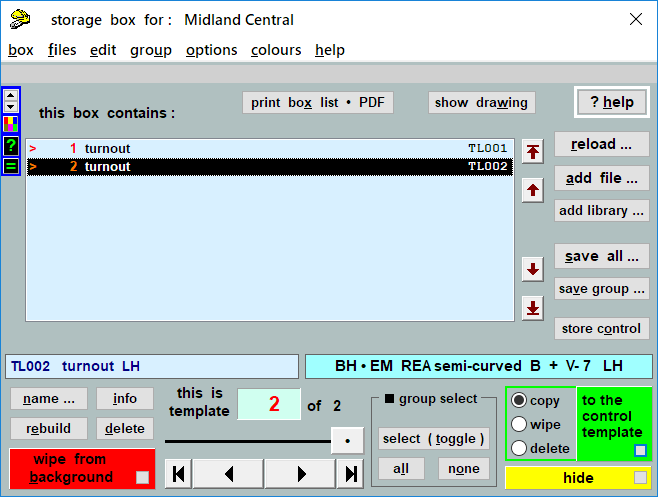
Looking in the storage box I can see that my track plan so far consists of just this one stored template:
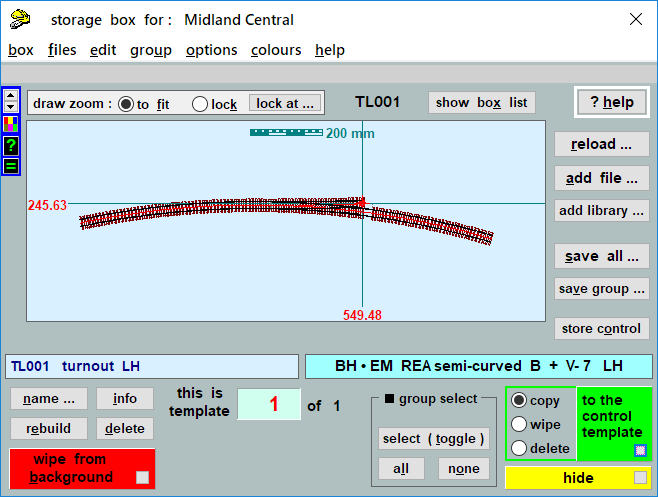
Templot has given it a serial number of TL001 (Turnout, Left-hand) and it is shown in the box with the track centre-line and co-ordinates in red, to indicate that it is a background template and is currently being displayed on the trackpad. The button is also red to indicate that the stored template is a background template, it is not a red error or warning. Other colours are used for stored templates which are not background templates, see later.
Returning to the trackpad I extend some exit track on the control template (F4 mouse action), and I am then ready to use another make tool:

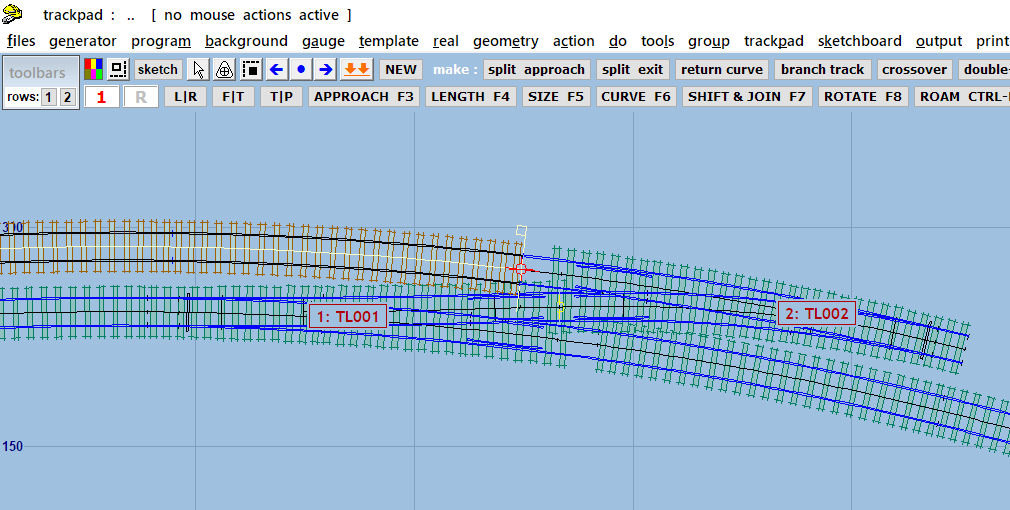
I want to insert a turnout in this exit track later, so I need to split it off from the turnout as a separate plain track template. Note again the word make: make split > make separate exit track. Templot repeats the make process and I now have 2 templates in the storage box and on the trackpad background:

Notice in all these screenshots that the control template is never part of the track plan, it is displayed always in front of it on the screen as the current output from the template generator. The control template can only become part of the track plan if I do a store & background, or Templot does it for me as part of a make function. There is more about this concept at origins and intent.
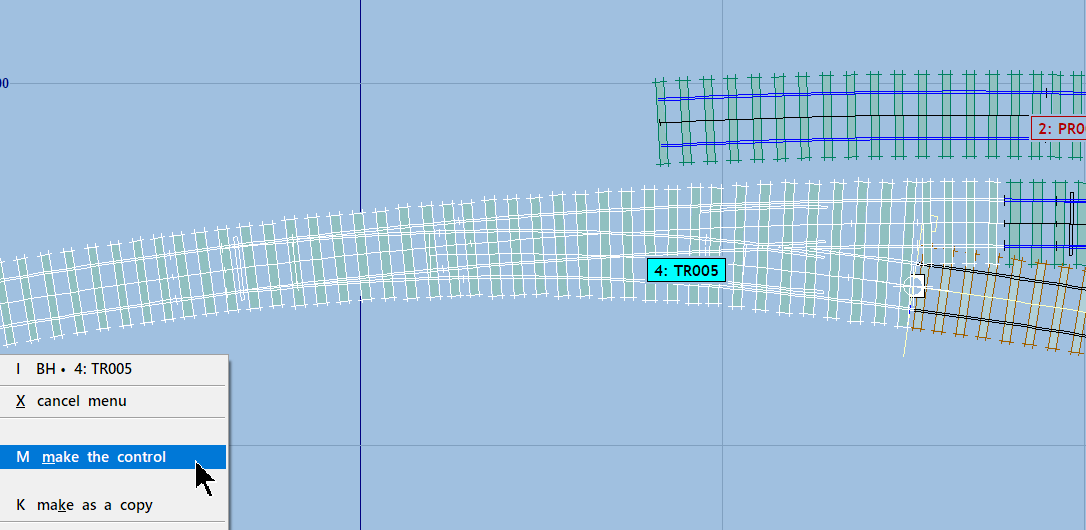
I have decided that I am not yet ready to do any more work on this plain track template, I want to go back and do more with the first turnout template. So I click on it:
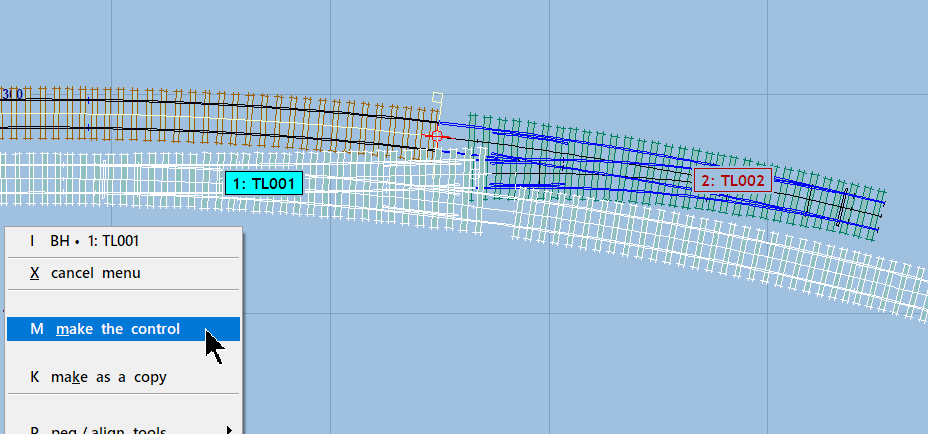
It is highlighted and its pop-up menu appears on the left of the screen. Every background template has a pop-up menu. It contains a great many functions and settings related to this background template. In this case I want the make the control menu item (or press M on the keyboard).
Notice again the word make there. Which means that Templot will again do a store & background for me on the current control template (the plain track template). But this time to create a new control template, it will remove (delete) this background template from the storage box and the background track plan, and will copy its settings back into the template generator:
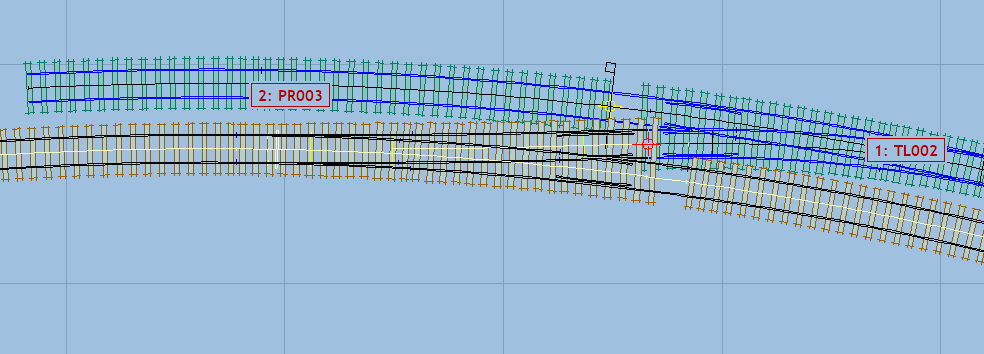
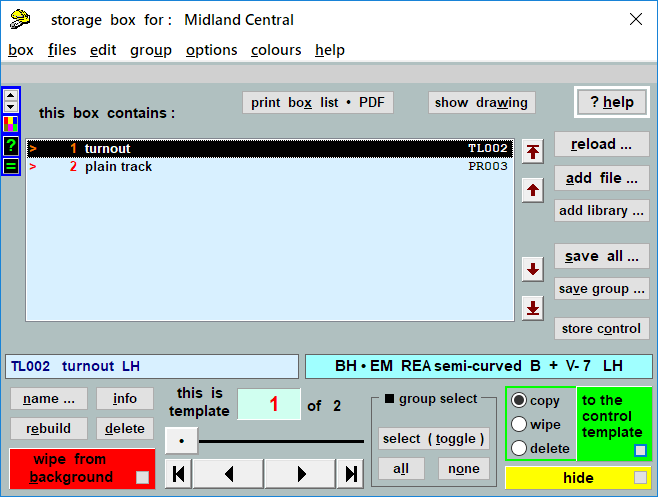
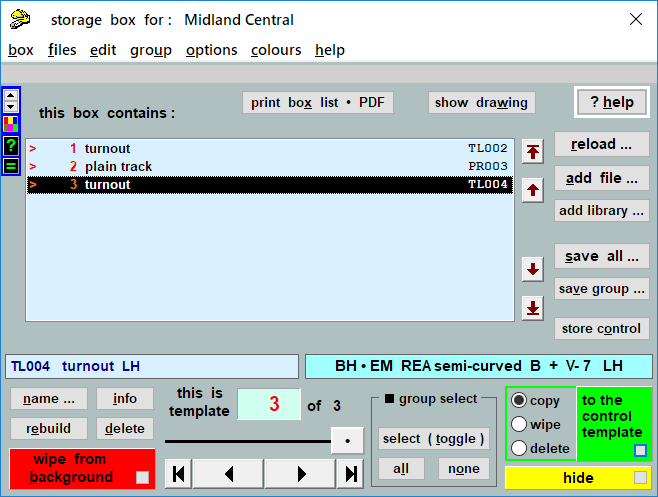
I still have 2 background templates in the storage box. But the first turnout has been removed, and there is now instead the plain track template PR003 (Plain track Right hand). Note that I haven't lost the first turnout, because its settings are now back in the control template where they started. But it is no longer in the track plan as a background template, so I need to keep that in mind if I make any changes to its settings.
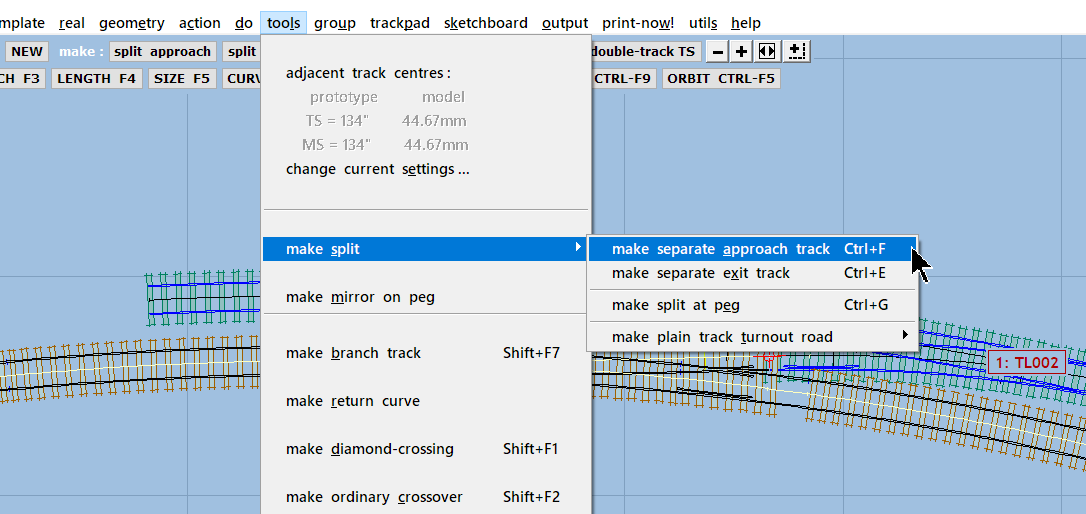
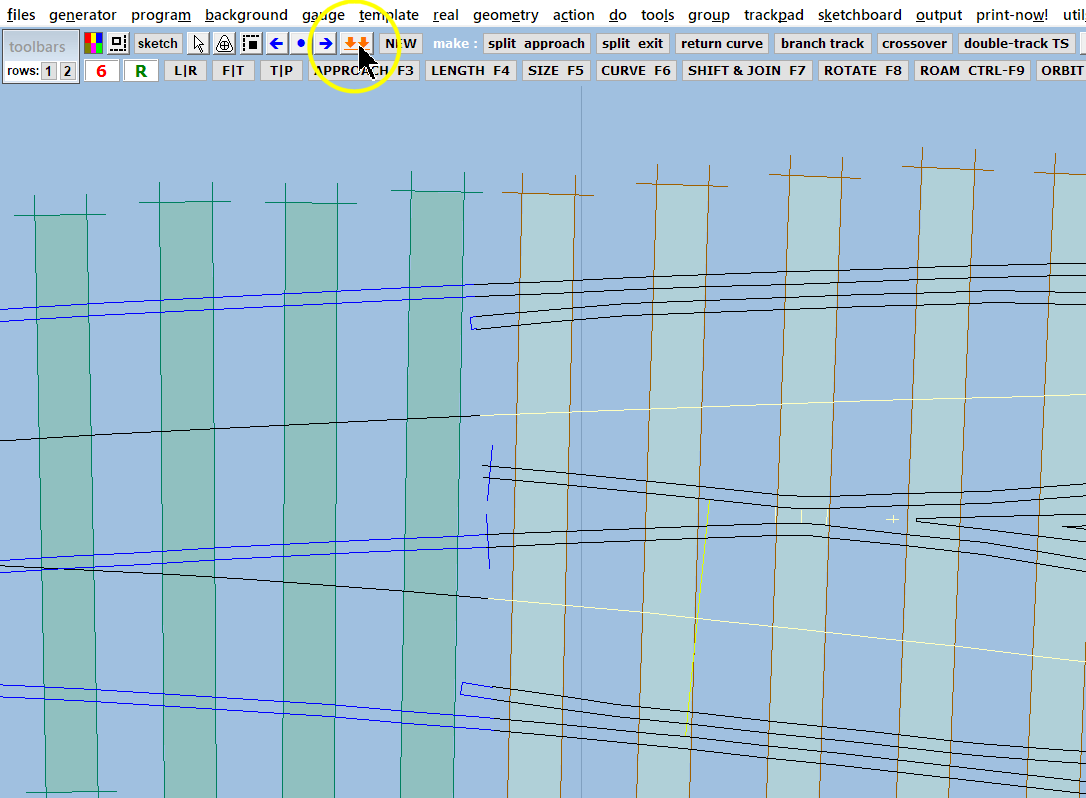
What I want to do is to split off its approach track, so again it is a make tool:
With the result:
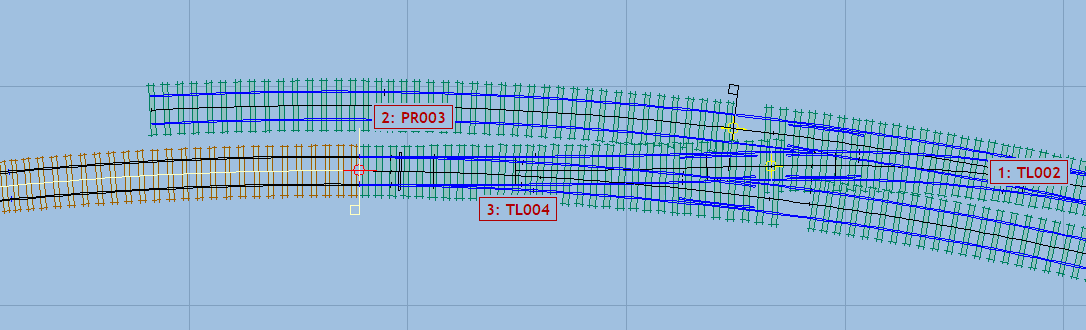
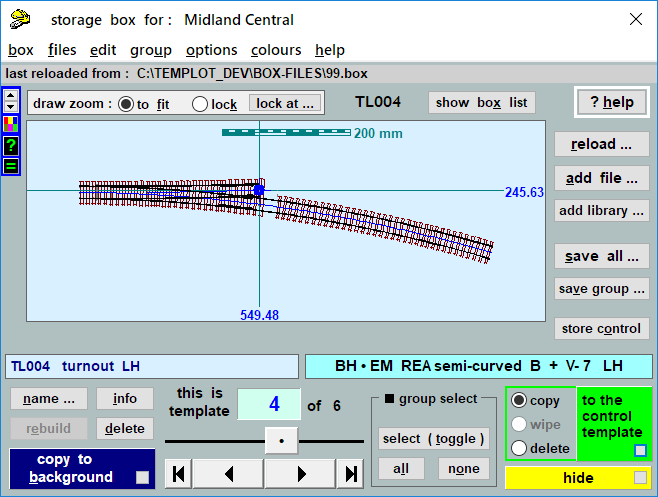
The turnout part is safely back unchanged in the storage box and on the track plan, with the updated serial number TL004.
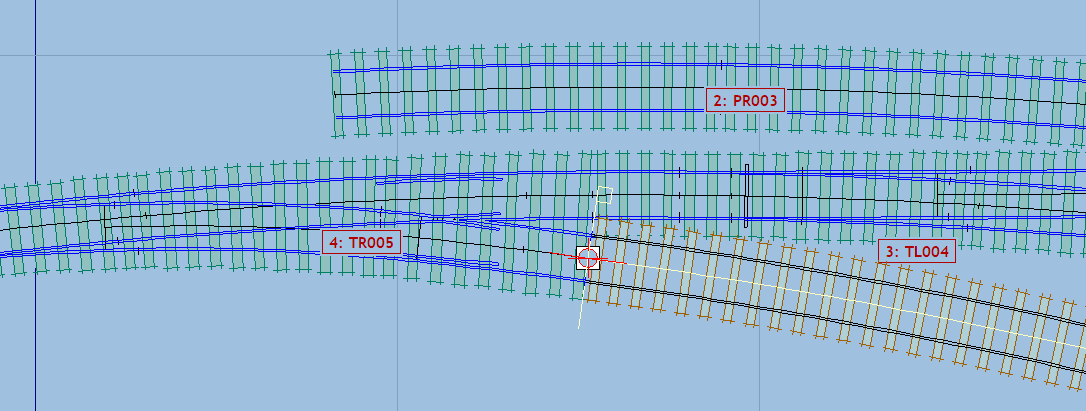
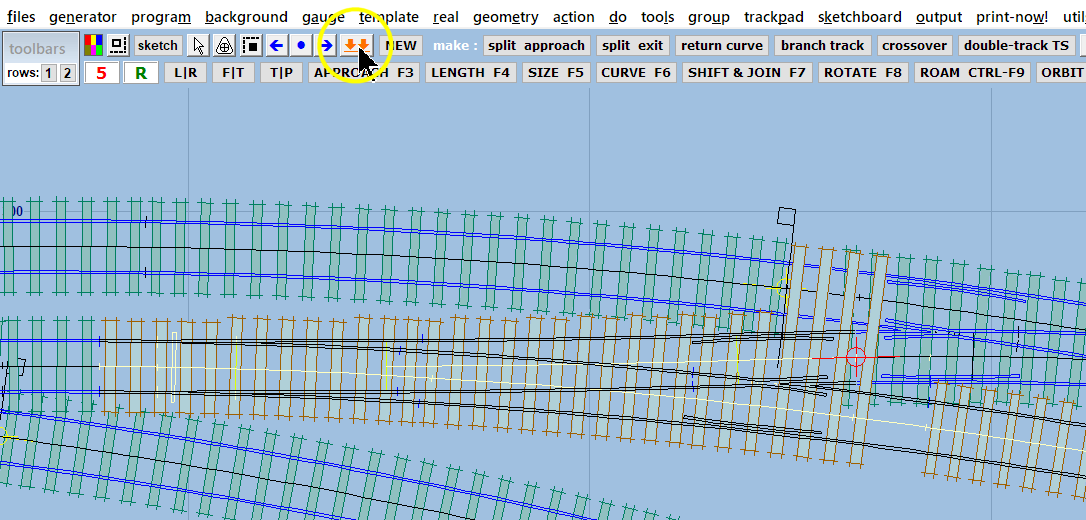
And I can now do some work on the plain track in the control template. I want to insert a turnout in it and create a siding. So that's another make tool, make branch track, and I now have 4 background templates in my track plan:
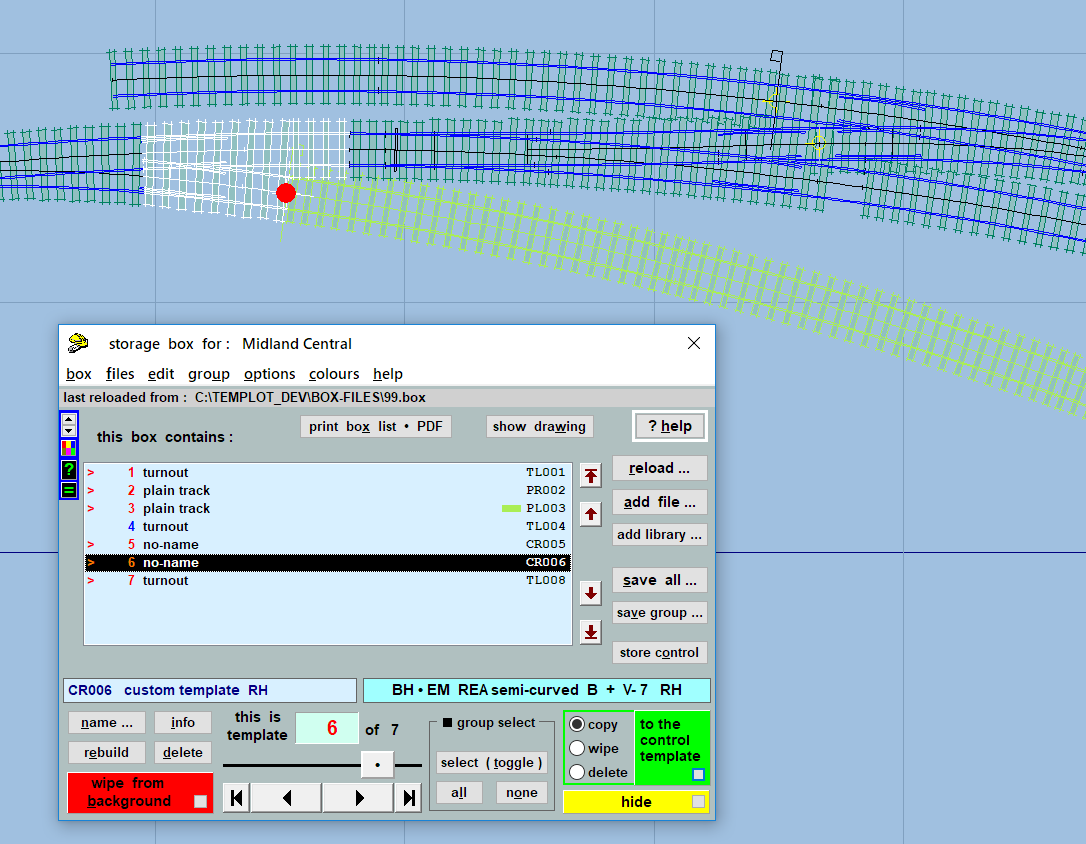
But it is actually the turnout which I want to work on. This siding has actually been taken Out Of Use, and to that end the switch blade and closure rail have been removed from the turnout. Disregarding how likely that is in prototype terms, it will be instructive in some of the further functions in Templot. So clicking on the turnout, I do make the control again to store the siding template and swap the turnout back into the control template:
With the turnout back in the control template, I can now make some changes to it.
The control template is the only place I can make changes such as this, it can't be done directly on a background template.
As you can see I have used the do > omit rails and joint marks... function to remove the turnout-road crossing rail:
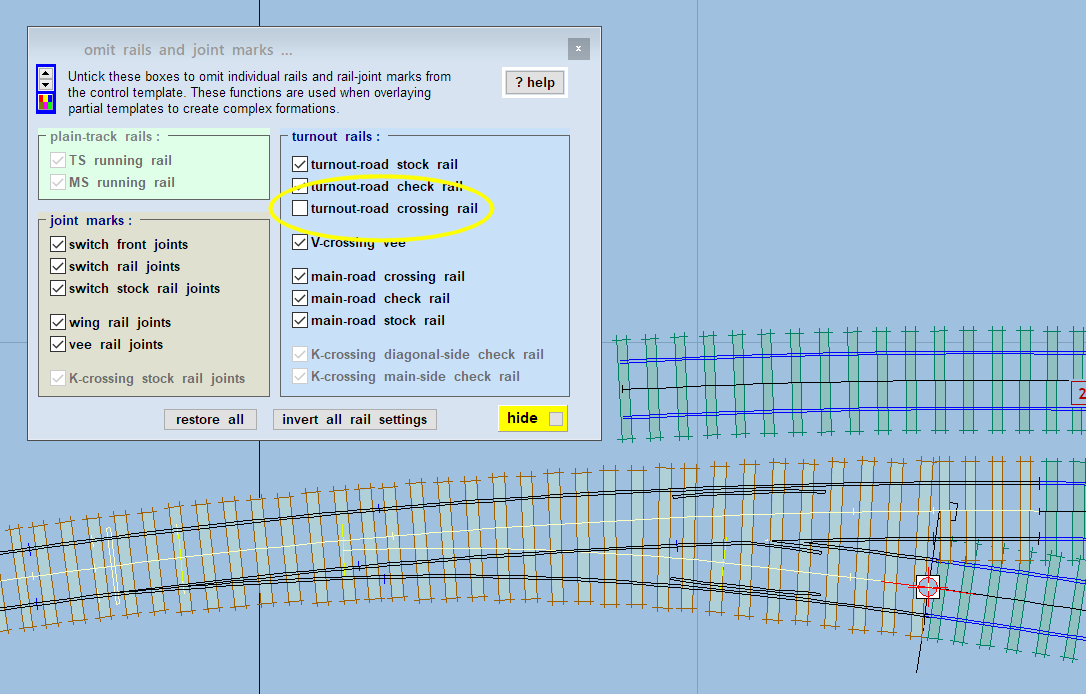
Unfortunately that has also removed the wing rail from the V-crossing. To get it back, I need to split this turnout into 2 partial templates, and store each one separately. The first one will be the section up to the wing-rail joints only.
So after remembering to move the peg back to the CTRL-0 position (click the peg position indicator), I have shortened this turnout (F4 mouse action) to the wing-rail front rail joint:
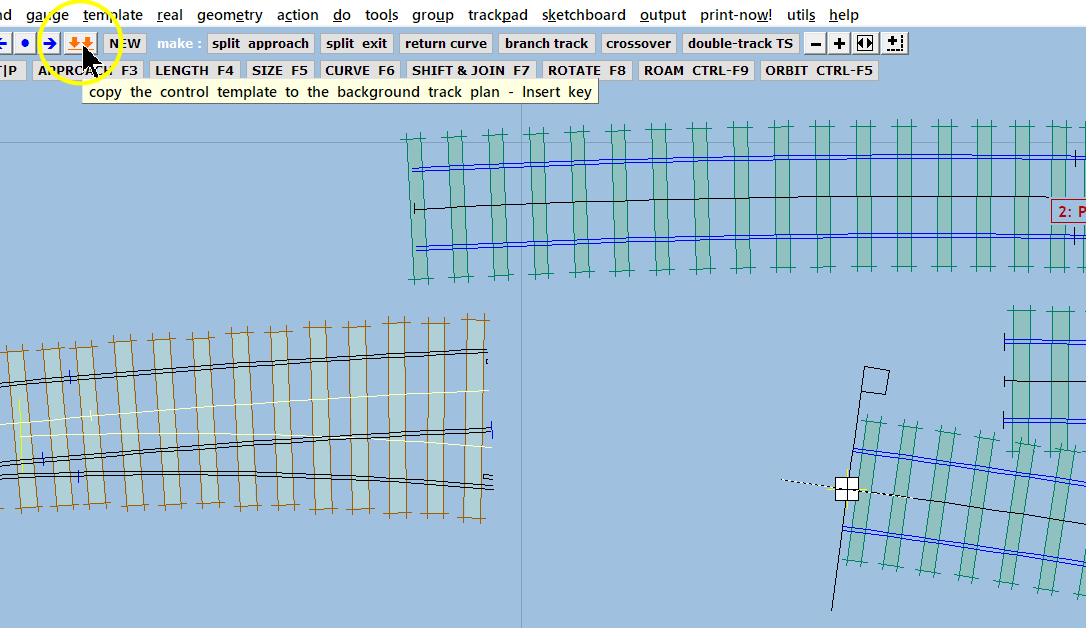
This is now a case where I need to do store & background myself, because there is no make function which will do this for me, I already have the turnout design in the control template. So I click the button, but very little seems to happen:
That's because the control template is still in front of the copy of it which is now on the background. You can confirm its presence from the name label just visible between the timbers, or by hiding the control template (HOME key), or simply by clicking on it. Clicking the control template does nothing, the click will go through to the background template and highlight it (if it exists).
Now the second partial template is needed, which will be remaining section of the turnout, with the wing rail restored.
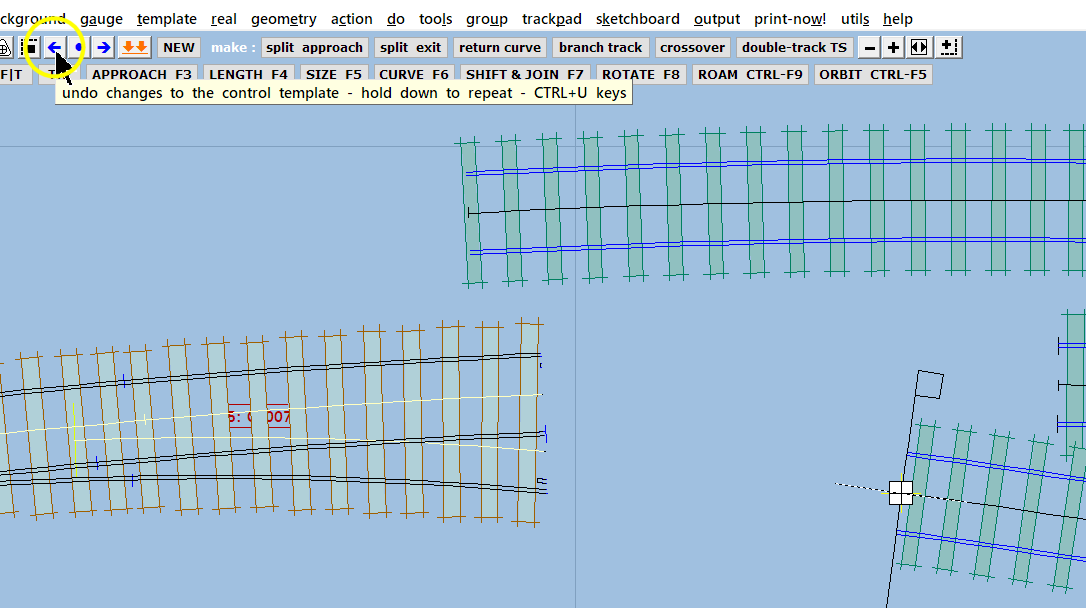
First I need to undo the shortening of the control template, and the removal of the crossing rail, until it is back to how it was before I did those things. The easy way to do that is to click the blue left arrow a few times undo changes, or SHIFT+CTRL+ROLL the mouse wheel back, until you find the control template which you are looking for. If you don't feel happy relying on the 80-slot rollback register, you could be ultra-cautious and park a copy of the control template in the do > parking bay before making those changes. Or you could use the the do > omit rails and joint marks... function again to restore the missing rail.
I used the mouse wheel (easiest and quick), and then the CTRL+F3 blanking length mouse action to blank off the control template up to the wing rail joint.
Here I have blanked it too far, so that you can see the effect of this mouse action. Notice a couple of other things - the fixing peg is back on CTRL-6 after undoing the changes which moved it. The blanking function is not affected by the peg position. And the background template has been given the serial number CR007 (Custom Right hand - custom because of the missing rail):

I zoomed in to make an accurate join, and now I'm going to do store & background on this too, while I have a coffee and a think, because I'm not yet ready to use the make tools again:
Back to work. I moved (F7 mouse action) the control template into fresh air, so that you can see the finished turnout with a rail removed, comprised of the 2 partial templates, each one stored separately. It is often useful to move the control template out of the way so that you can see what you are doing. Remember that it is not part of your track plan, so it doesn't matter where you put it. This is often the only use for the F7 move function once track planning is under way, unlike in other planning software.
I switched off the name labels (END key) because they can get annoying, and are easily switched back on if needed.
Now I've decided that I want the original turnout to have square-on timbering instead of equalized, so I have clicked on it to get its pop-up menu:

This time I don't want to use make to get it back into the control template, otherwise I will be creating an unwanted background template from the control template. Which if I hadn't moved it would be a duplicate of the one I stored before the coffee.
However, I'm not entirely sure about this change, so I have decided to do wipe to the control which not only skips that part of the make function, but also leaves the template in the storage box as an unused template while copying its settings back into the control template. As an unused template it is no longer a background template, no longer part of the track plan, and no longer showing on the trackpad screen. But it is still a stored template, and remains in the storage box (and in the data file if the templates are saved):
As an unused template it shows in blue in the storage box. From there it could be quickly copied back to the background, or into the control template, if wanted. So if I change my mind, I can easily get it back. Unlike a conventional undo function, that could be a week later, because it will still be in the template data file.
Obviously a simple change to the timbering style could be made in the control template at any time. But an unused template might contain several more complex settings such as a custom switch, timber shoving, or check rail adjustments, say. By storing a template containing them they can be easily retrieved and re-used at any time if wanted.
In other circumstances you may want to wipe a group of several templates (an entire goods yard for example) while you try a different design wipe group. Having decided that you preferred the original after all, you can easily copy the group of unused templates to the background again. For this purpose the prefix tags a very useful, making it easy to recreate the original group when needed.
After making the timbering changes I wanted, I'm ready to do store & background again:
And I now have the beginnings of my track plan, and several templates in my storage box:
I changed the marker colour of the siding template to indicate it is out of use. Notice that the marker colour is indicated in the storage box.
Currently the 6th template is highlighted in the box list, and therefore also shows highlighted on the trackpad while the storage box is showing. By running up and down the list using the arrow keys on the keyboard, you can quickly find the corresponding background template on your track plan.
The unused template is 4th in the list and shows numbered in blue.
I have now decided that I want the upper turnout to be replaced with a single slip into the goods yard.
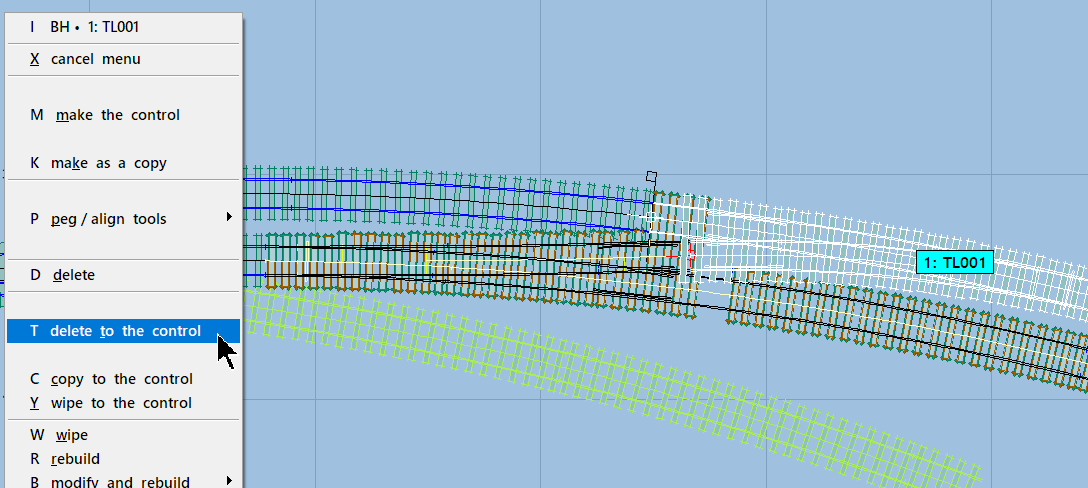
There is a make tool to do this. But like all make tools it needs to start from the control template, and it will be storing a background template. Which means I first need to get this turnout back into the control template, and also remove the existing background template from the track plan to make a clear space for the new one.
So in this case, after clicking on the turnout, I do delete to the control on its menu.
Then I can do tools > make slip to create the slip, and the result is:
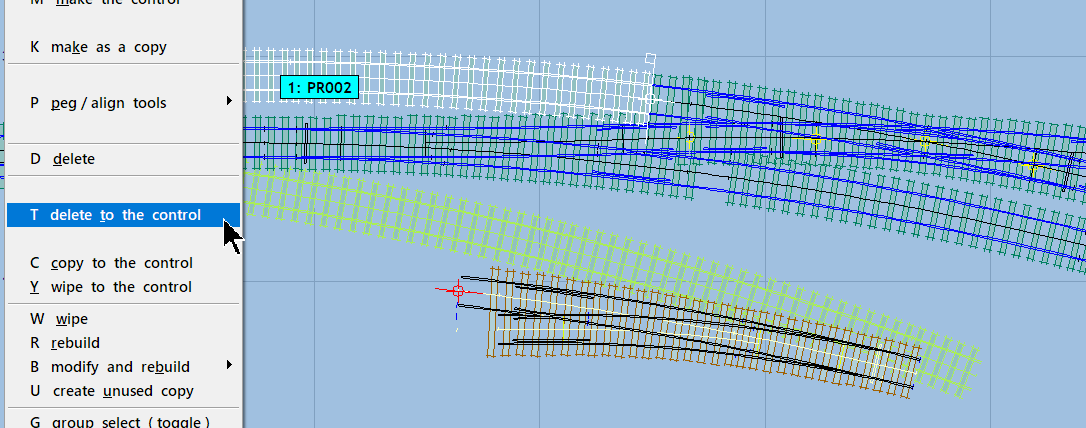
The make slip function doesn't store the original turnout, so in case I might need it again, it throws it to one side. In fact I don't need it, what I want to do is insert a turnout in the upper track. So that's delete to the control again, in the process discarding the thrown aside turnout.
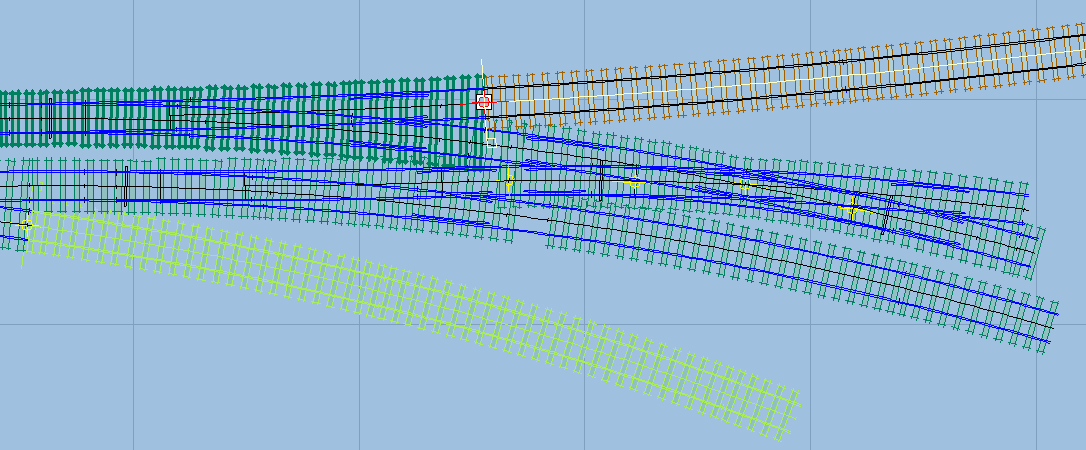
And after inserting a turnout in it, I can do make branch track and add another siding:
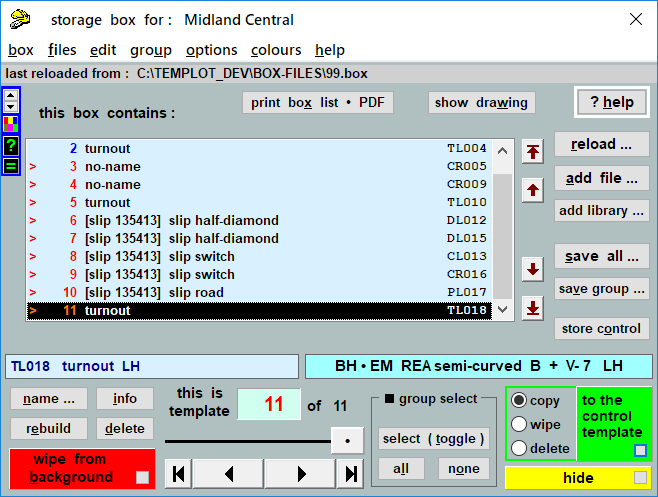
I now have 11 templates in my storage box, including 5 making up the slip, and 1 unused:
... to be continued
link to this page: https://85a.uk/templot/companion/basic_working_methods.php